The hog wire fence is the new thing! Details Landscape Art has designed and built gardens since 1991, and our work includes patios, walkways, water features, retaining walls, dry creek beds, tapestries of beautiful plantings, overhead arbors and fencing.
And there has always been a call for open ‘see-through’ fencing, especially where the view must be maintained, yet where the deer must be kept out. For years we have built welded wire or woven wire fences (and still do), but now with the advent of the decorative hog wire fence we can add another decorative and functional element to the garden.
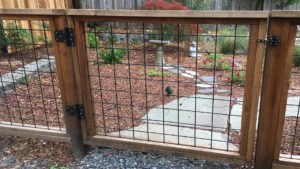
Hog wire essentially comes in two sizes: 3 ft. by 8 ft. or 5 ft. by 6 ft. panels. We love love love the black powder coated hog wire, which looks fabulous with redwood framing.
Let’s assume for purposes of this blog, that the homeowner requests a five-foot high fence, the redwood used for framing will be S4S (surfaced redwood), and that the terrain along the length of the fence is level ground.
We begin, as with any fence, with laying out a taut string line between two stakes along the path of the proposed fence. We will be using 5 ft. by 6 ft. panels, with the 5 ft. side vertical, and the 6 ft. side horizontal. The hog wire fence panels will be attached to the posts using ¾ inch galvanized staples. The surfaced redwood posts are 3 ½ inches x 3 ½ inches. We mark the center of the post-holes along the string line 6 ft., 1¾ inches apart (6 ft. for the length of the hog wire, and half the width of the 3 ½ inch post. If there is a shorter leftover section at the end of the fence, we will have to cut one hog wire panel to fit. The post-holes are dug to a depth of 16 inches below grade (sufficient for the relatively light weight of the hog wire fence sections). A second taut string line is now run exactly 5 ft. 1 inch (61 inches) directly above the lower string line
We then begin assembling fence sections. The first section will require attaching the hog wire to two posts pre-cut to 77 inches long (5 ft. hog wire = 60 inches, plus 16 inches in the post-hole, plus 1 inch clearance above grade). The bottom 2×4 rail is then screwed between the posts along the bottom edge of the hog wire, and the hog wire is then stapled to this bottom rail. This assembled section of two posts, one hog wire section and bottom rail is then placed into the first two post-holes, touching the two string lines, and leveled and plumbed. Concrete is then pre-mixed with water in a wheelbarrow and poured into the post-holes, with the concrete slightly crowned on top to allow water to run off away fro the post when it rains.
While this concrete is allowed to set up (harden), we begin assembling the next hog wire fence section. The only difference is that since this next section will be attached to the post on the first section, this second section will only include one post. This assembly is placed in the next post-hole and the hog wire and the bottom rail are attached to the first section’s post prior to pouring concrete. Then this section is lined up with the string lines, leveled and plumb, and then set in concrete.
Succeeding fence sections are assembled and installed until the hog wire fence is complete. At this point a 2×6 redwood cap is screwed down on top of the posts (a fifteen foot long 2×6 will span 3 posts). The end of the 2x6s should come to the center of the top of the post so two 2×6’s can share a post.
The redwood posts, 2x4s and 2x6s may be stained, and the black hog wire against the stained redwood is striking!