The horizontal fence is a relatively recent addition to the repertoire of Details Landscape Art, one of Sonoma County’s elite design-build contractors.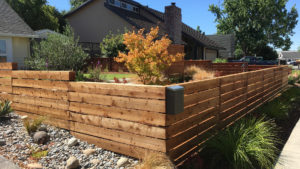
As recent posts have indicated, we have been building fences as part of the landscape services we have offered since 1991. The horizontal fence has become increasingly more popular as a unique more modern look, and can be built at almost any height…typically we build them three feet, four feet, five feet or six feet tall. We can also choose from a variety of horizontal fence board widths and spacing. We can use 1×4 or 1×6 or 1×8 boards, and space them 1”, 1 ½”, 2” apart, or no spacing at all (see photo below of no spacing).
For purposes of this blog we will assume a three-foot high fence, horizontal 1×4 fence boards spaced 1” apart, built with surfaced redwood, along level ground. A subsequent blog will discuss the construction of fences on sloped or uneven ground.
One of the differences between a horizontal fence and any vertical fence is the spacing of the posts. Since fence boards attached horizontally tend to sag under their own weight, we believe they need more support. So instead of the usual eight-foot spacing of fence posts for a vertical fence, we typically space the posts four feet apart for a horizontal fence.
As with any fence construction, we begin by laying out a taut string line along the ground of the entire length of the desired fence. This string line serves as the guide against which to set the posts so we can ensure a straight fence. For a three-foot high fence, eighteen-inch deep post-holes are sufficient. So we dig our holes about eight inches in diameter four feet apart along the string line, making sure that the hole extends two inches in front of the string line. This is so that when the post is aligned with the string line there are a couple inches of concrete in front of the post.
The posts are then cut to 55 inches long (18’below ground in the hole, 1’ clearance above grade, and then 36’ for the fence. A second taut string line is run 37” directly above the first string line. The posts are placed in the hole, aligned with both string lines, leveled and plumbed.
Now we begin attaching the 1×4 fence boards. Moving left to right and starting at the top of the post, the first eight-foot long fence board is screwed flush to the left side of the first post at the very top. The center of this eight footer is screwed to the next post, four feet away. The right side end of this board should end up ‘splitting’ the third post in the center, allowing half a post width to attach the next board. We continue attaching the next uppermost 1×4 to the next set of posts, splitting the third post in the series again, and continue to the end of the fence. We usually wait to set the last fence post until the end so we can make the final fence board flush with the right side of the last post.
Now we move down to the next line of fence boards. Since we want our horizontal fence boards to be 1” apart, we cut a 1” spacer out of scrap wood, and use this along the length of each board to ensure exact spacing all the way along the fence. We screw this second line of fence boards in a similar fashion to the first line, using the spacer each time we attach to the post. We continue with the third line of board and so forth until we reach the bottom of the fence, making sure to leave 1’ clearance above grade. Each surfaced 1×4 board is 3 ½” wide, and with a 1” space totals 4 ½” for each line. Eight lines of boards, therefore, totals 36” with a one inch space at the bottom. Perfect!
Now the icing on the cake is a 1×6 or 2×6 cap on top of the posts. A twelve-footer should span four posts; a sixteen footer should span five posts. Be sure to split the end of the 2×6 on the center of the post.
Now with an optional staining we have constructed a beautiful horizontal fence!