Details Landscape Art, a Sonoma County design-build landscape contractor, is frequently called upon to build a redwood retaining wall. Whether to hold back an existing slope, or to level out an area, retaining walls are usually constructed using concrete (faced with stone) or with redwood. This blog focuses on the redwood retaining wall.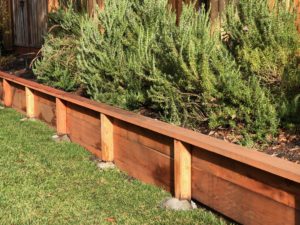
The principles of construction are the same regardless of the length of the wall. If there is a drop in elevation or an increase in elevation along the length of the wall, the wall may be ‘stepped down or up’. We never build walls on a slant. This blog will assume level ground. Note that various municipalities have regulations requiring a permit if the wall is to exceed a certain height, usually three feet or four feet.
The first step is to determine the dimensions of the wall, both length and height, in order to develop a materials list. The height of the wall should be sufficient to hold back whatever slope is behind it. If possible, we prefer to build an eighteen-inch high wall with a cap, so it may also serve as a seat wall. If the wall is to be eighteen inches high, and the cap is two inches thick, that leaves sixteen inches of horizontal redwood material to span the posts. That may be two 2x8s or a 2×6 and a 2×10.
The length of the wall will determine how many 4×4 posts will be required. Note that unlike a fence with posts eight feet apart, we like to space the retaining wall posts five feet apart since they are not only supporting the wall structure, but the pressure of the slope to be retained. And for an eighteen-inch high redwood retaining wall we set the posts eighteen inches deep in the ground. So that’s a total of thirty six inches for each post, so a twelve foot long 4×4 will yield 4 thirty six inch posts.
A sixteen-foot long 2×6 cap will span three five foot wall sections, so determine how many five-foot sections will span the length of the wall and divide by sixteen. So with the addition of 3 ½ inch screws and a bag of concrete for each post hole we are ready to order the wood material.
Construction begins with laying out a string line along the ground, and marking the post-hole locations every five feet. We lay this string line at least eight inches from the slope to allow subsequent installation of a French drain behind the wall. The holes are then dug with a post-hole digger to a depth of eighteen inches. A second string line is run sixteen inches directly above the first string line as a guide to the exact height of the post placement.
We then start constructing fence sections, attaching the horizontal redwood material to the center of the precut thirty-six inch posts. Then the next section can be attached to the center of the previous section’s last post. Each section is set in the holes, aligned with the two string lines, and the concrete is pre-mixed and poured in the holes. We are careful to slightly mound up the top of the concrete to allow water to run away from the post. All sections are installed.
Then, before the cap is placed, we prefer to install the French drain at this point so as to not soil or mark the cap. Wrapped, perforated drainpipe is laid behind the wall, and at least twelve inches of ¾” crushed drain rock covers the drainpipe. Then the 2×6 cap is cut to length (again to the center of the last post, so the next cap section can be attached) and screwed down onto the posts and along the top of the horizontal redwood material.
And the result is a beautiful and functional redwood retaining wall that may be stained if desired.