
Fences on slopes require a different approach than fences built on level ground. At Details Landscape Art, we regularly construct fences on uneven terrain throughout Sonoma County, and over the years we have developed methods that create attractive, durable, and professional-looking results.
Whether we are building a privacy fence, a hog-wire fence, or a horizontal fence, the basic construction principles remain the same. The primary challenge is adapting the fence to changing elevations while maintaining a clean finished appearance.
Why Fences on Slopes Are Different
Many homeowners assume that a fence should simply follow the angle of the ground. While this may seem logical, the result often looks awkward and amateurish.
Instead, we prefer what is commonly called a stepped fence.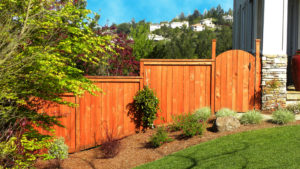 Fences on slopes – stepped down style
With a stepped fence, each fence section remains level, while successive sections step up or down as the terrain changes. The result is a fence that looks straight, balanced, and professionally constructed.
Building Fences on Slopes
Construction begins much like any other fence project.
A taut string line is established along the desired fence alignment. The string line serves as a guide for locating and aligning the fence posts.
Post spacing generally remains the same as on level ground. Privacy fences typically utilize wider spacing, while horizontal fences require posts to be spaced closer together because the horizontal boards need additional support.
The primary difference is that downhill posts must be longer than uphill posts.
As the ground elevation changes, the length of each post is adjusted so that the tops of the posts remain level. This allows each fence section to be built perfectly level even though the terrain below may be sloping.
The Stepped Fence Appearance
Once the posts are installed, the fence sections are constructed between them just as they would be on level ground.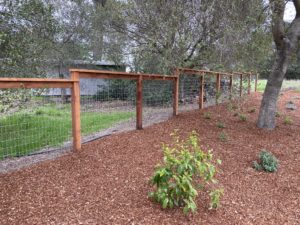 Fences on slopes – each fence section steps down
Because the fence section remains level while the ground slopes beneath it, a triangular space gradually appears below the fence on the downhill side of each section.
This space becomes smaller as the fence approaches the next uphill post.
Depending on the situation, the opening beneath the fence may be left alone or filled with a custom-cut redwood kicker board that follows the contour of the ground and creates a more finished appearance.
The size of these openings varies because few slopes are perfectly uniform.
Finishing Details
The final adjustment involves the fence cap.
On level ground, a redwood cap can often span multiple fence sections. On sloped sites, however, each stepped section may require shorter cap pieces because adjacent fence sections are no longer at the same elevation.
Although this requires additional cutting and fitting, the finished appearance is well worth the effort.
A Professional Solution for Uneven Terrain
Many Sonoma County properties contain slopes, hillsides, and uneven grades. Properly constructed fences on slopes require careful planning, accurate measurements, and attention to detail.
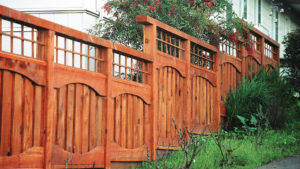
Fences on slopes
By adjusting post lengths, maintaining level fence sections, and incorporating a stepped design, it is possible to build a fence that follows the terrain while maintaining a clean, professional appearance.
At Details Landscape Art, we apply these construction techniques to privacy fences, hog-wire fences, horizontal fences, and other custom fencing projects throughout Sonoma County.